
There’s something magical about biting into a Russian tea cake – that moment when the powdered sugar coating meets the buttery, crumbly cookie and everything melts together on your tongue. These beloved cookies have graced holiday tables for generations, yet many bakers struggle with tea cakes that spread too thin, turn out dry, or lose their signature snowball shape.
Russian tea cakes are simple shortbread-style cookies made with butter, flour, powdered sugar, and nuts, rolled into balls and coated twice in powdered sugar for that classic snowball appearance. Whether you call them Mexican Wedding Cookies, Snowball Cookies, or Russian tea cookies, this authentic russian tea cakes recipe delivers perfect results every time.
In this comprehensive guide, you’ll learn the secrets to perfect Russian tea cake cookies, including pro tips from 75+ years of baking tradition, troubleshooting solutions, and creative variations that will make your cookies the star of any gathering.
What Are Russian Tea Cakes? (Understanding These Classic Cookies)
The Many Names: Russian Tea Cakes vs Mexican Wedding Cookies vs Snowball Cookies
These delightful cookies go by many names across different cultures and regions. While the russian tea cakes recipe remains essentially the same, you might know them as:
| Name | Region/Context | Key Characteristics |
| Russian Tea Cakes | United States | Traditional holiday cookie |
| Mexican Wedding Cookies | Southwest US/Mexico | Often served at celebrations |
| Snowball Cookies | General US | Named for powdered sugar coating |
| Polvorones | Spain/Latin America | Sometimes made with lard |
| Butterballs | Southern US | Emphasizes butter content |
| Russian Tea Sweets | Eastern Europe | Original inspiration |
What Makes Them Special: Texture, Taste, and Tradition
What does russian tea cakes taste like? Imagine the most tender, buttery shortbread enhanced with toasted nuts and enveloped in sweet powdered sugar. These cookies literally melt in your mouth, creating a unique textural experience that’s both crumbly and creamy. The combination of butter, nuts, and sugar creates a rich yet delicate flavor that pairs perfectly with coffee, tea, or hot chocolate.
The Fascinating History Behind the Name
The origins of Russian tea cake cookies remain somewhat mysterious. Despite their name, they likely didn’t originate in Russia. Food historians suggest these cookies evolved from Eastern European tea biscuits that became popular at American “Russian tea parties” – fundraising events in the 19th century where exotic teas and sweets were served. The recipe for russian tea cakes as we know them today solidified in American cookbooks by the 1950s, with Betty Crocker publishing their now-famous version in 1950.
Essential Ingredients for Perfect Russian Tea Cakes
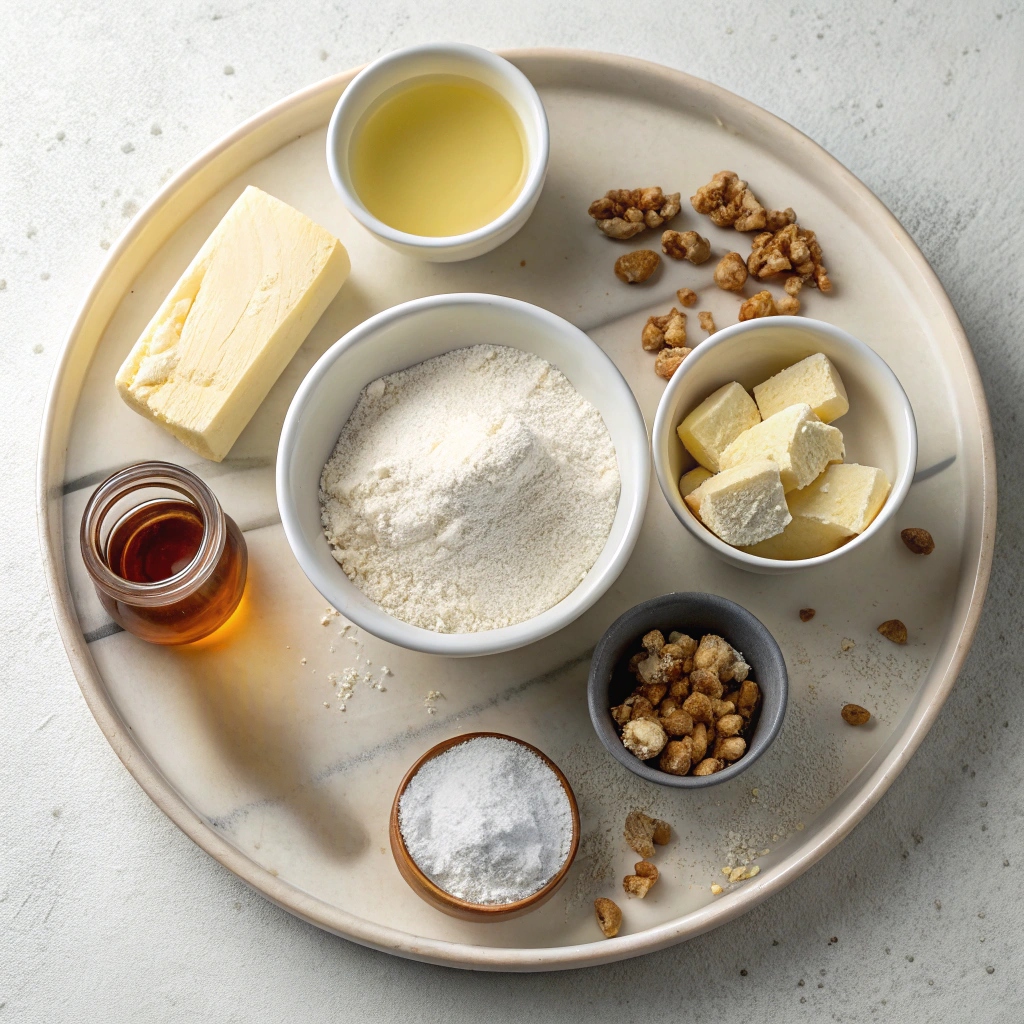
Understanding what are the ingredients for homemade russian tea cakes helps ensure success. Here’s what you’ll need for this easy russian tea cakes recipe:
Butter (1 cup/226g): The foundation of these cookies. Use high-quality unsalted butter at room temperature – not melted, not cold. The butter creates that melt-in-your-mouth texture that makes this russian tea cakes cookie recipe so special.
Powdered Sugar (1/2 cup for dough + 2 cups for rolling): Also called confectioner’s sugar, this gives the cookies their tender crumb and signature sweet coating. The fine texture prevents grittiness in your russian tea cake recipe.
All-Purpose Flour (2 1/4 cups/280g): Provides structure while keeping cookies tender. Measure correctly by spooning and leveling – too much flour is the enemy of tender cookies.
Vanilla Extract (1 teaspoon): Pure vanilla extract adds warmth and depth. This small addition elevates any russian tea cookies recipe from good to exceptional.
Salt (1/4 teaspoon): Balances sweetness and enhances all flavors. Use fine sea salt or table salt.
Nuts (3/4 cup, finely chopped): Traditional choices include pecans or walnuts, adding texture and nutty richness to your cookies.
Choosing the Right Nuts: Pecans vs Walnuts vs Alternatives
The best russian tea cakes recipes allow for flexibility with nuts:
- Pecans: Sweet, buttery flavor that complements the cookie perfectly
- Walnuts: Slightly bitter edge that balances the sweetness
- Almonds: Delicate flavor and extra crunch
- Pistachios: Unique flavor and beautiful color
- Macadamia nuts: Ultimate luxury with buttery richness
Why Quality Butter Makes All the Difference?
In this russian tea cake cookies recipe, butter is the star. European-style butter with 82% fat content creates the most tender, flavorful cookies. Brands like Kerrygold, Plugra, or local creamery butters will elevate your mom’s russian tea cakes recipe to bakery-level quality.
Ingredient Substitution Guide:
| Original Ingredient | Substitution | Notes |
| Butter | Vegan butter | Use same amount, cookies may be slightly less rich |
| Nuts | Mini chocolate chips | Add 1/4 cup extra flour to maintain structure |
| All-purpose flour | Half whole wheat | Adds nutty flavor and darker color |
| Powdered sugar | Coconut sugar (processed fine) | Different flavor profile, less sweet |
The Secret to Outstanding Russian Tea Cakes (Pro Techniques)
Why Toasting Nuts is Non-Negotiable?
The single most important step in any authentic russian tea cakes recipe is toasting your nuts. This 5-minute process transforms good cookies into exceptional ones. Here’s how:
- Heat a dry skillet over medium heat
- Add nuts in a single layer
- Stir frequently for 5 minutes until fragrant and golden
- Transfer immediately to a cutting board to cool
Visual Guide to Perfect Nut Toasting:
- Under-toasted (3 minutes): Pale, no aroma – keep going
- Perfect (5 minutes): Golden brown, fragrant, oils released
- Over-toasted (7+ minutes): Dark brown, bitter smell – start over
The Brown Butter Technique for Next-Level Flavor
While traditional russian tea cakes recipes use regular softened butter, browning it first adds incredible depth. This professional technique, featured in elevated russian tea cookies recipes, creates nutty, caramel notes that complement the toasted nuts perfectly.
To brown butter for your recipe russian tea cakes:
- Melt butter in a light-colored pan over medium heat
- Swirl occasionally as it foams and sizzles
- Watch for golden-brown color and nutty aroma (5-7 minutes)
- Immediately transfer to a bowl and cool to room temperature
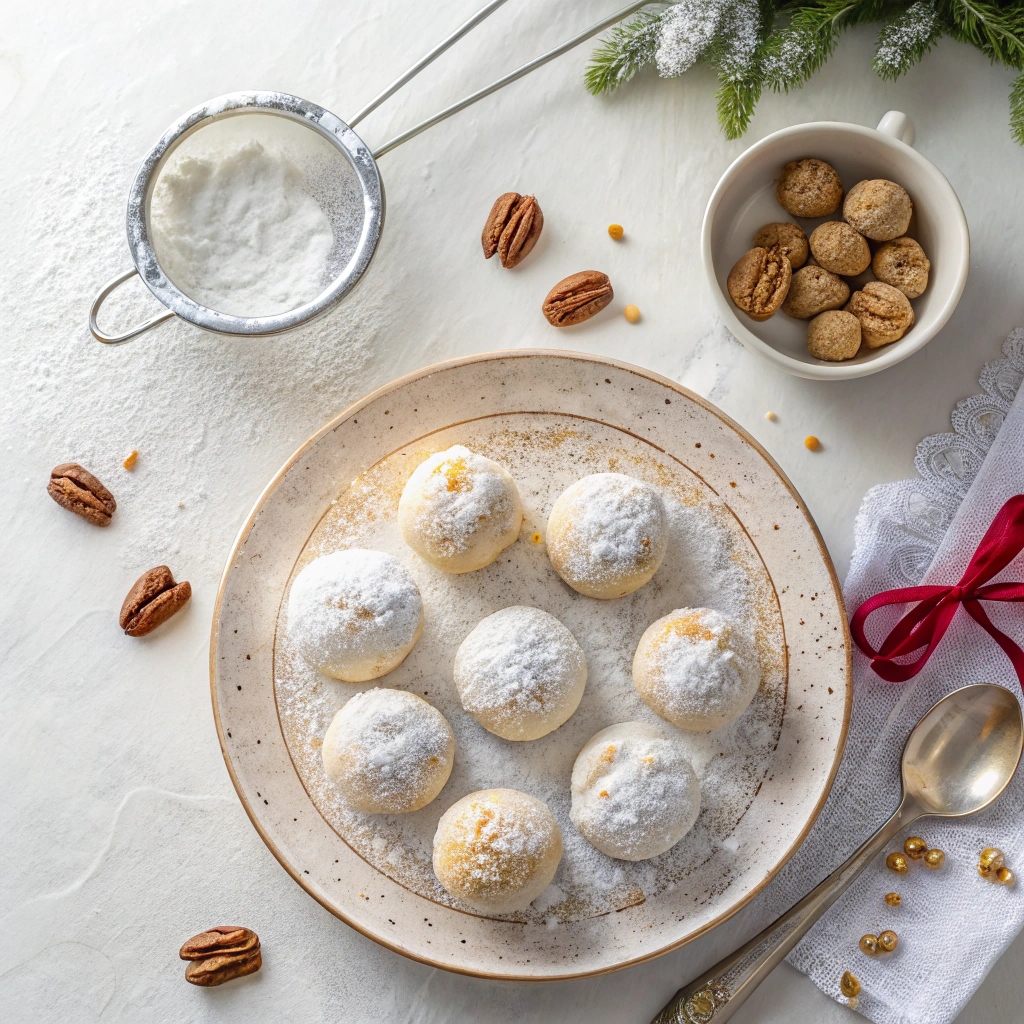
Double-Rolling Method for Perfect Sugar Coating
The signature snowy appearance comes from a specific technique. With russian tea cakes is the sugar meant to melt after cooked? Actually, yes and no – here’s the secret:
First Roll (Warm Cookies): Roll cookies in powdered sugar while still warm from the oven. The slight melting helps the sugar adhere, creating a base layer that seals in moisture.
Second Roll (Cooled Cookies): Once completely cooled, roll again for that picture-perfect, snow-white finish. This double-coating ensures your cookies look bakery-fresh for days.
Step-by-Step Russian Tea Cakes Recipe
Now let’s create the perfect batch of these melt-in-your-mouth cookies. This recipe for russian tea cakes yields approximately 48 cookies.
Step 1: Prep and Toast Your Nuts
Begin your russian tea cakes cookie recipe by preheating the oven to 375°F (190°C). Line two baking sheets with parchment paper. Toast your nuts as described above, then chop finely once cooled. The pieces should be small enough to incorporate smoothly but large enough to add texture.
Step 2: Cream Butter and Sugar Properly
In a large mixing bowl, beat the softened butter with 1/2 cup powdered sugar until light and fluffy – about 3-4 minutes with an electric mixer. This step is crucial for tender cookies. The mixture should be pale and increased in volume. Add vanilla extract and beat for another 30 seconds.
Step 3: Mix Dough Without Overworking
Add flour and salt to the butter mixture. Mix on low speed just until the dough comes together – it will look crumbly at first, then suddenly form a cohesive dough. Fold in the toasted nuts with a spatula, distributing evenly throughout. The dough for these easy russian tea cakes should hold together when squeezed but not be sticky.
Step 4: Shape Perfect 1-Inch Balls
Using a small cookie scoop or your hands, portion the dough into 1-inch balls. Roll each portion between your palms until smooth and round. Place on prepared baking sheets about 1 inch apart – these cookies don’t spread much. For uniform cookies in your russian tea cookies recipe, use a small scale to weigh each portion (about 15g each).
Step 5: Bake to Golden Perfection
Bake for 12-15 minutes, rotating the pans halfway through. The cookies are done when the bottoms are light golden and the tops are set but still pale. They should feel firm to gentle pressure but not hard. Overbaking is the enemy of tender russian tea cake cookies.
Step 6: Master the Double Sugar Roll
Let cookies cool on the pan for 2 minutes – just until you can handle them. Fill a shallow bowl with powdered sugar. Roll each warm cookie gently in sugar, coating completely. Place on a wire rack to cool completely, about 20 minutes. Once cooled, roll again in fresh powdered sugar for that signature snowball appearance.
Pro Time-Saving Tips:
- Make dough up to 3 days ahead and refrigerate
- Freeze shaped balls for up to 1 month; bake directly from frozen (add 1-2 minutes)
- Set up an assembly line: one person shapes while another rolls in sugar
- Double or triple this russian tea cakes recipes for holiday cookie exchanges
Troubleshooting Common Russian Tea Cake Problems
Even experienced bakers encounter issues with russian tea cakes recipes. Here’s how to solve the most common problems:
Why Did My Cookies Flatten? (And How to Fix It)
Flat cookies are the most common issue with any russian tea cake recipe. The causes and solutions:
Butter Too Warm: If your butter is melted or too soft, cookies will spread. The butter should be at room temperature – pressing it should leave an indentation but not sink through.
Oven Not Preheated: Starting in a cold oven means butter melts before the structure sets. Always wait for full preheating.
Old Leavening: While these cookies don’t use baking powder, old flour can affect structure. Use fresh ingredients for best results.
Fix: Refrigerate remaining dough for 30 minutes before shaping and baking the next batch.
Dealing with Dry or Crumbly Dough
If your dough won’t hold together for this russian tea cakes cookie recipe:
Too Much Flour: The most common culprit. Remember to spoon and level, never scoop directly from the bag.
Under-mixed: Sometimes the dough needs more mixing to come together. Use a stand mixer for 2-3 minutes or hand mixer for 4-5 minutes.
Fix: Add 1-2 tablespoons of softened butter and mix until the dough coheres.
Preventing Sticky or Clumpy Sugar Coating
Nobody wants gray, clumpy cookies instead of snowy white ones:
Rolling Too Hot: If cookies are steaming, the sugar will melt and clump. Wait 2 minutes but no longer than 5 for the first roll.
Humid Conditions: Moisture in the air affects the coating. Work quickly and store properly.
Fix: Sift fresh powdered sugar for the second coating and work in small batches.
Getting the Perfect Golden Bottom Without Burning
The ideal russian tea cake has a light golden bottom while the top stays pale:
Dark Pans: These absorb more heat and over-brown bottoms. Use light-colored aluminum pans.
Lower Rack: Cookies on the bottom rack brown faster. Use middle rack or rotate pans halfway.
Fix: If bottoms are browning too quickly, stack two baking sheets together for insulation.
Creative Variations and Flavor Twists
Once you’ve mastered the basic russian tea cakes recipe, try these creative spins:
Nut-Free Options That Still Taste Amazing
For those with allergies or preferences, these nut-free russian tea cookies maintain the classic texture:
Chocolate Chip Snowballs: Replace nuts with 3/4 cup mini chocolate chips. The small size distributes evenly without weighing down the delicate dough.
Toffee Crunch: Use 3/4 cup toffee bits for butterscotch flavor that complements the buttery base perfectly.
Plain Vanilla: Simply omit nuts and add an extra 1/4 cup flour. Increase vanilla to 2 teaspoons for more flavor in your russian tea cake cookies.
Coconut Dreams: Use 3/4 cup finely shredded coconut (toasted for best flavor) as your mix-in.
Seasonal Flavors: From Peppermint to Pumpkin Spice
Transform your authentic russian tea cakes recipe with seasonal additions:
Holiday Spice Russian Tea Cakes:
- Add 1 teaspoon cinnamon + 1/4 teaspoon nutmeg to flour
- Use pecans for complementary flavor
- Dust with cinnamon-sugar mixture instead of plain powdered sugar
Peppermint Snowballs:
- Add 1/2 teaspoon peppermint extract with vanilla
- Crush candy canes and mix into final powdered sugar coating
- Perfect for Christmas cookie platters
Lemon Sunshine Tea Cakes:
- Add 2 tablespoons fresh lemon zest to butter mixture
- Replace vanilla with lemon extract
- Mix powdered sugar with a touch of lemon zest for coating
Pumpkin Spice Russian Tea Sweets:
- Add 2 teaspoons pumpkin pie spice to flour
- Use toasted pecans for autumn flavor
- Optional: orange zest in the dough
Chocolate Lovers’ Variations
For those who can’t resist chocolate in their russian tea cookies recipe:
Double Chocolate Snowballs:
- Replace 1/4 cup flour with unsweetened cocoa powder
- Add 1/2 cup mini chocolate chips
- Roll in mixture of powdered sugar and cocoa
Mocha Russian Tea Cakes:
- Add 1 tablespoon instant espresso powder to flour
- Use toasted hazelnuts for authentic mocha flavor
- Dust with coffee-flavored powdered sugar
White Chocolate Macadamia:
- Use toasted macadamia nuts
- Add 1/2 cup finely chopped white chocolate
- Pure luxury in cookie form
Flavor Combination Matrix:
| Base Flavor | Nut Choice | Add-In | Special Coating |
| Vanilla | Pecans | None | Classic powdered sugar |
| Almond | Almonds | None | Vanilla powdered sugar |
| Chocolate | Hazelnuts | Mini chips | Cocoa-sugar blend |
| Spice | Walnuts | None | Cinnamon sugar |
| Citrus | Pistachios | Zest | Lemon sugar |
Storage, Freezing, and Make-Ahead Tips
Proper storage ensures your russian tea cakes recipes stay fresh and delicious:
Proper Storage for Maximum Freshness
Room Temperature Storage:
- Store in an airtight container with tight-fitting lid
- Layer between parchment or wax paper
- Keeps fresh for 5-7 days
- Re-roll in powdered sugar before serving if needed
The Best Containers:
- Metal tins maintain consistent temperature
- Glass containers let you see the cookies
- Plastic works but may trap moisture
- Never store in bags – cookies will break
Freezing Techniques for Year-Round Enjoyment
These easy russian tea cakes freeze beautifully using two methods:
Method 1: Freeze Baked Cookies
- Cool completely after first sugar coating
- Layer in freezer-safe containers with parchment
- Freeze up to 2 months
- Thaw at room temperature 1 hour
- Re-roll in fresh powdered sugar before serving
Method 2: Freeze Dough Balls
- Shape dough into balls
- Freeze on baking sheet until solid
- Transfer to freezer bags
- Bake directly from frozen (add 2-3 minutes to baking time)
- Perfect for fresh cookies anytime
Holiday Cookie Exchange Strategies
Make your russian tea cake cookies the star of any cookie swap:
Presentation Tips:
- Package in clear cellophane bags tied with ribbon
- Include a copy of this recipe for russian tea cakes
- Layer in decorative tins with mini cupcake liners
- Add a tag noting they’re nut-free if applicable
Batch Planning:
- One recipe makes 48 cookies
- Plan 6-8 cookies per exchange package
- Make dough 3 days ahead
- Bake and roll the day before
- Final sugar coating the morning of exchange
Transport Safely:
- Use rigid containers to prevent crushing
- Separate layers with parchment
- Keep cool but not refrigerated
- Bring extra powdered sugar for touch-ups
Frequently Asked Questions (FAQ)
With Russian tea cakes, is the sugar meant to melt after cooked?
Yes, partially! The first coating of powdered sugar is applied while cookies are still warm, causing slight melting that helps it adhere. This creates a sweet “seal” on the cookie. The second coating, applied after cooling, stays powdery and white. This double-coating technique is what gives the best russian tea cakes their signature appearance and prevents the sugar from disappearing during storage.
What does Russian tea cakes taste like?
Russian tea cakes offer a unique taste experience – imagine the most tender, buttery shortbread cookie enhanced with toasted nuts and sweet powdered sugar. They literally melt on your tongue, creating a delicate, crumbly texture. The flavor is rich but not overly sweet, with the nuts providing a pleasant contrast to the buttery base. Each bite delivers a perfect balance of sweet, nutty, and buttery flavors.
Can I make Russian tea cakes without nuts?
Absolutely! Nut-free russian tea cookies are just as delicious. When omitting nuts from your russian tea cakes cookie recipe, add an extra 1/4 cup of flour to maintain proper texture. You can also substitute with mini chocolate chips, toffee bits, or shredded coconut. The cookies will be slightly more delicate without nuts, so handle them gently when rolling in sugar.
Why are my Russian tea cakes not holding their shape?
Several factors affect shape retention in any russian tea cake recipe:
- Butter temperature: Must be softened, not melted
- Oven temperature: Too low causes spreading before setting
- Flour measurement: Too little flour creates flat cookies
- Dough consistency: Should hold together when squeezed
Fix flat cookies by chilling the dough 30 minutes before shaping and ensuring your oven is fully preheated.
What’s the best Russian tea cakes cookie recipe for beginners?
This recipe is perfect for beginners! The key to success with easy russian tea cakes:
- Use room temperature ingredients
- Don’t skip toasting the nuts
- Measure flour correctly (spoon and level)
- Watch baking time carefully
- Be patient with the double-rolling process
Start with the basic vanilla-pecan version before trying variations. Once you master the technique, every batch of your mom’s russian tea cakes recipe will turn out perfectly!
Conclusion
You now have everything needed to create perfect Russian tea cakes – from understanding the crucial toasting step to mastering the double-roll technique. These timeless cookies have earned their place on holiday tables and cookie exchanges for good reason. Whether you call them Russian tea cookies, Mexican Wedding Cookies, or Snowball Cookies, one thing remains constant: their irresistible melt-in-your-mouth texture and delicate sweetness.
Remember the key points for success with any russian tea cakes recipe: toast your nuts, use quality butter, measure accurately, and embrace the double-rolling technique. With these fundamentals mastered, you can confidently experiment with the variations and create your own signature version of these beloved cookies.
Ready to create your own batch of these melt-in-your-mouth cookies? Save this authentic russian tea cakes recipe and share your results in the comments below! Whether it’s your first time making russian tea cake cookies or you’re perfecting your grandmother’s recipe, we’d love to hear about your baking adventure.
Russian Tea Cakes (Snowball Cookies)
Ingredients
Equipment
Method
- Preheat oven to 375°F (190°C). Line two baking sheets with parchment paper.
- Toast nuts in a dry skillet over medium heat for 5 minutes, stirring frequently until fragrant and lightly golden. Transfer to cutting board, cool completely, then chop finely.
- In a large mixing bowl, beat softened butter and ½ cup powdered sugar with electric mixer until light and fluffy, about 3-4 minutes. Add vanilla extract and beat 30 seconds more.
- Add flour and salt to butter mixture. Mix on low speed just until dough comes together. The mixture will look crumbly at first, then form a cohesive dough.
- Using a spatula, fold in toasted nuts until evenly distributed throughout the dough.
- Shape dough into 1-inch balls (about 15g each) using hands or small cookie scoop. Place on prepared baking sheets about 1 inch apart.
- Bake for 12-15 minutes, rotating pans halfway through, until bottoms are light golden and tops are set but still pale.
- Let cookies cool on pan for 2 minutes. While still warm, gently roll each cookie in powdered sugar, coating completely. Place on wire rack to cool completely, about 20 minutes.
- Once cooled, roll cookies again in fresh powdered sugar for perfect snowball appearance. Store in airtight container up to 1 week.